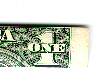
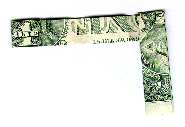
 Start by folding the white border (no more, no less) at the top and bottom of
the bill toward the obverse (front) side. The picture here only shows the end,
but do this evenly down the entire length of the note.
Start by folding the white border (no more, no less) at the top and bottom of
the bill toward the obverse (front) side. The picture here only shows the end,
but do this evenly down the entire length of the note.The Ring
This is something I learned in high school in the late seventies, so it has been around a while. I don't know how much further back this one goes (Update!). It is pretty simple to do, but it is real tough to describe. Hopefully, the pictures will be helpful enough to get you through.
As with all these instructions, try to start with a relatively clean, crisp bill. It will make the process easier. All folds should be sharply creased. It helps to go over the fold with a fingernail on a flat, hard surface.
For your first attempt, use a 1 dollar bill, as the description is based on
the features of the reverse face of that bill. After you've done a couple
you can try out different denominations.
Start by folding the white border (no more, no less) at the top and bottom of
the bill toward the obverse (front) side. The picture here only shows the end,
but do this evenly down the entire length of the note.
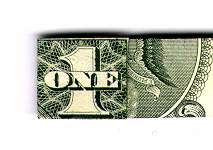
![]() Fold the bill precisely in half lengthwise, twice. If you've folded
very carefully, the ONE insignia will be evenly framed top and bottom,
and the width will be even along the entire length.
Fold the bill precisely in half lengthwise, twice. If you've folded
very carefully, the ONE insignia will be evenly framed top and bottom,
and the width will be even along the entire length.
 On one end, fold the
white border at the edge
back. Fold on the other side of the ONE insignia so that it is evenly
framed in a square as shown. (The lower picture shows this fold purposely
folded skewed to help you see what I'm trying to explain. Make your own folds
as precise as possible.)
On one end, fold the
white border at the edge
back. Fold on the other side of the ONE insignia so that it is evenly
framed in a square as shown. (The lower picture shows this fold purposely
folded skewed to help you see what I'm trying to explain. Make your own folds
as precise as possible.)
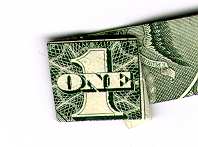 To simplify the description in the following steps we'll call this end of the
bill the head. The other end of the bill will be called the tail.
To simplify the description in the following steps we'll call this end of the
bill the head. The other end of the bill will be called the tail.
 Start curving the bill away from the head as shown. Pay particular
attention to the direction of the curve relative the folds made in the
head. (If you curve the wrong way you won't be able to complete later
steps.) It sometimes helps to 'rub' over the corner of a tabletop or
similar surface to get a nice curve out of a stiff bill.
Start curving the bill away from the head as shown. Pay particular
attention to the direction of the curve relative the folds made in the
head. (If you curve the wrong way you won't be able to complete later
steps.) It sometimes helps to 'rub' over the corner of a tabletop or
similar surface to get a nice curve out of a stiff bill.
 Next make a 90 degree bend in the bill as shown. Where this bend is made
will determine the size of the ring. The further from the head, the larger
the ring. (The curve from the previous step is flat in this picture because
of the scanning process.) Once you're used to making these, you can wrap the
curve around your own finger to estimate the correct position for this fold.
For now, just use the picture for a guide.
Next make a 90 degree bend in the bill as shown. Where this bend is made
will determine the size of the ring. The further from the head, the larger
the ring. (The curve from the previous step is flat in this picture because
of the scanning process.) Once you're used to making these, you can wrap the
curve around your own finger to estimate the correct position for this fold.
For now, just use the picture for a guide.
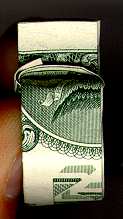
 Now wrap the tail tightly around as shown. (In this picture the portion
to the left is shown in the same position as in the previous picture, and
the tail folds underneath.)
Now wrap the tail tightly around as shown. (In this picture the portion
to the left is shown in the same position as in the previous picture, and
the tail folds underneath.)
 Using the curve
created three steps above, Loop the head back around to a position on top
of the 90 degree bend made in the previous steps.
Using the curve
created three steps above, Loop the head back around to a position on top
of the 90 degree bend made in the previous steps.
Continue wrapping the tail around the body of the ring until all the excess
length of the tail is used up. If you've followed the previous steps closely,
the very end of the tail will be on the outside of the ring (under the bend
in the head).
 This picture
shows the tail wrapped all the
way around and the head at the top of the photo. Using your fingernail (or
anything else convenient, I use a key most of the time), spread the gap between
the wrapped portion of the tail and the body of the ring. In this gap, tuck
the last fold in the head.
This picture
shows the tail wrapped all the
way around and the head at the top of the photo. Using your fingernail (or
anything else convenient, I use a key most of the time), spread the gap between
the wrapped portion of the tail and the body of the ring. In this gap, tuck
the last fold in the head.

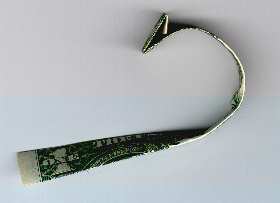
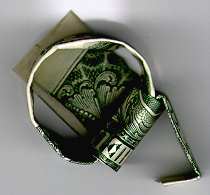
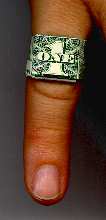 These two photos
show the finished product. This also works well with 10s and 50s. 5 and 20
dollar bills work, but require a bit of adaptation due to the difference in
size and position of the denomination insignia in the corner of the bill.
Work with 1s and 10s until you get the hang of it.
These two photos
show the finished product. This also works well with 10s and 50s. 5 and 20
dollar bills work, but require a bit of adaptation due to the difference in
size and position of the denomination insignia in the corner of the bill.
Work with 1s and 10s until you get the hang of it.